
BotTwo has a few modes of operation.
- In one of his Autonomous Modes, he can wander about aimlessly, simply avoiding objects, all the while building or refining a map of his surroundings for future use.
- A second function in his Autonomous Modes allows you to select a location from his floorplan map, and he will find the shortest path to it, using A* algorithm.
- In Manual Mode, you can drive him like an RC Car from a webpage.

This is the mode that I will describe here, with code examples for each programming platform. As part of my learning process, I chose a very simple DIY approach, as opposed to a framework like node.js
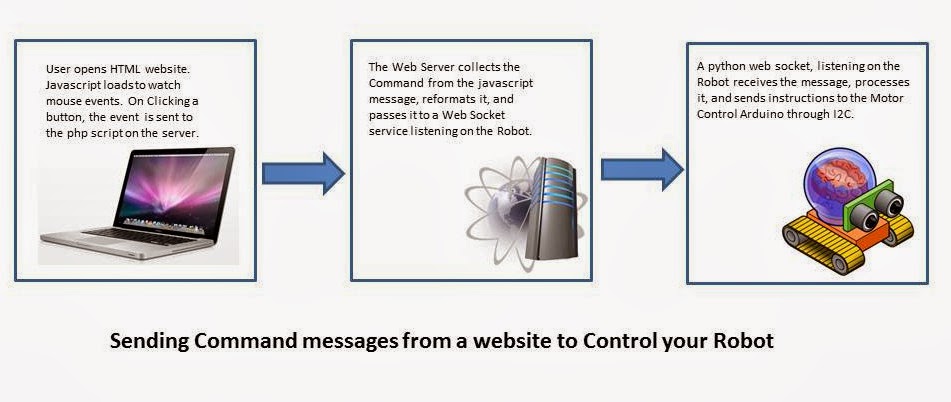
This example starts with a HTML page that uses javascript to pass a Command variable and associated Parameter variable to a php script.
The php script opens a simple Web Socket to the Raspberry Pi on the Robot, and passes the command to it.
This is just one of many ways to do this, but it works well for me, and may be a starting place for you.
I chose to run my webserver (Apache/Php/MySQL) on a dedicated computer, as my Raspberry Pi is up and down as I'm working on it, or as the battery dies. You may chose to run the webserver on your Pi.
Here will present the HTML page, along with it's associated javascript, and php scripts that enable sending a command in real-time from a Button Control panel on your laptop/tablet/phone to your robot.

This HTML document simply sets up an imagemap of a button console, and attaches javascript actions to the area shapes that comprise the buttons:
<area shape="circle"
coords="43,43,32"
onClick="sendCommand(4,0);"
onMouseOver="showButtons('Look Left');"
onMouseOut="showButtons('');"/>
A slider Control or HTML5 <input type= "range"> is used to send speed control messages using the same methods described below.
<!DOCTYPE html PUBLIC "-//W3C//DTD XHTML 1.0 Transitional//EN""http://www.w3.org/TR/xhtml1/DTD/xhtml1-transitional.dtd"><html xmlns="http://www.w3.org/1999/xhtml"xml:lang="en"><head><title>Control Testing for Raspberry Pi/Arduino Autonomous Platform</title><meta http-equiv="Content-Type"content="text/html; charset=iso-8859-1" /><script src="//ajax.googleapis.com/ajax/libs/jquery/1.10.2/jquery.min.js" type="text/javascript"></script><script src='autonomous.js'></script></head><?PHP include("insert_commands.php"); ?><body onload='init();' ><center><H1> Control Panel for Web Guided Robot </H1><BR> <HR> <BR><center><b>Navigation Controls</b></center><div><center><style>.help {background-color: #FFFF73;border-radius: 10px;display: none;opacity: 0.9;padding: 10px;z-index: 100;}.help_link:hover + span {display: inline;}</style><form name="myform"><center><b>Action:</b> <input type="text" name="stage" size="10" /><b>Param:</b> <input type="text" name="param" alt="Param" id="param" size="3" value="100"/><br><a href="#" class="help_link">Help</a><span class="help">Distance you want to travel in mm.</span><br /><b>Speed:</b><input type="range" id="speed" value="50" min="0" max="100" onchange="changeSpeed();"/><div id="uno"> </div></center></form><!-- Create Mappings --><img src="button_box_new.png" alt="Navigational Buttons"border="0" usemap="#buttons"/><map name="buttons"><area shape="circle"coords="43,43,32"onClick="sendCommand(4,0);"onMouseOver="showButtons('Look Left');"onMouseOut="showButtons('');"/><area shape="circle"coords="130,43,32"onClick="sendCommand(6,0);"onMouseOver="showButtons('Look Ahead');"onMouseOut="showButtons('');"/><area shape="circle"coords="217,43,32"onClick="sendCommand(5,0);"onMouseOver="showButtons('Look Right');"onMouseOut="showButtons('');"/><area shape="circle"coords="43,130,32"onClick="sendCommand(8,135);"onMouseOver="showButtons('Look Up');"onMouseOut="showButtons('');"/><area shape="circle"coords="130,130,32"onClick="sendCommand('f',100);"onMouseOver="showButtons('Move Forward');"onMouseOut="showButtons('');"/><area shape="circle"coords="217,130,32"onClick="sendCommand(6,45);"onMouseOver="showButtons('Look Toward');"onMouseOut="showButtons('');"/><area shape="circle"coords="43,217,32"onClick="sendCommand('l',100)"onMouseOver="showButtons('Turn Left');"onMouseOut="showButtons('')"/><area shape="circle"coords="130,217,32"onClick="sendCommand('x',0)"onMouseOver="showButtons('Full Stop');"onMouseOut="showButtons('')"/><area shape="circle"coords="217,217,32"onClick="sendCommand('r',100)"onMouseOver="showButtons('Turn Right');"onMouseOut="showButtons('')"/><area shape="circle"coords="43,304,32"onClick="sendCommand(2,5)"onMouseOver="showButtons('Sonar Scan');"onMouseOut="showButtons('')"/><area shape="circle"coords="130,304,32"onClick="sendCommand('b',100)"onMouseOver="showButtons('Move Backward');"onMouseOut="showButtons('')"/><area shape="circle"coords="217,304,32"onClick="sendCommand(3,5)"onMouseOver="showButtons('Sonar Sweep');"onMouseOut="showButtons('')"/><area shape="circle"coords="43,391,32"onClick="sendCommand(10,0)"onMouseOver="showButtons('Sleep/Wake');"onMouseOut="showButtons('')"/><area shape="circle"coords="130,391,32"onClick="sendCommand(31,10)"onMouseOver="showButtons('Random Walk');"onMouseOut="showButtons('')"/><area shape="circle"coords="217,391,32"onClick="sendCommand('t',5)"onMouseOver="showButtons('Turn Toward');"onMouseOut="showButtons('')"/></map></center></div><center><p>Copyright 2013 Michael Ball<a href="http://arduino-pi.blogspot.com" target ="new">Arduino-Pi</a>Email: <a href="mailto:unix_guru@hotmail.com?Subject=Arduino-Pi" target="new">unix_guru@hotmail.com</a></p></center></body></html>
On action, the Command and Parameter values are passed to php via the sendCommand function.
// #########################################################################
// autonomous.js
function showButtons(name){ / Show imagemap buttons values for controlling robotdocument.myform.stage.value = name;}function changeSpeed(){ // Slider control for managing robot speedvar speed=document.getElementById("speed");$.get("insert_commands.php", { command: 18, parameter: speed.value }, // In my case '18' is the commandfunction(command,parameter){ }, "json"); // to change motor speed}// This function passes both the Command and Parameter Variables from the Image map // to a serverside PHP Script which will create a Websocket to the Robot.function sendCommand(command,parameter){var parameter2=document.getElementById("param");if(parameter2 > 0) parameter = parameter2.value; // Override default$.get("insert_commands.php", { command: command, parameter: parameter2.value },function(command,parameter){}, "json");}function init() {// Initalize the various page elements here...// in this case it is a dummy function...}
The php script accepts the Command and Parameter values, formats them into a string, and passes them to the Raspberry Pi, via a Web Socket.
<?php/*# BotTwo "insert_commands.php" Takes a Command/Paramater pair and sends# them to A listening robot via Web Socket# 2014 Michael Ball unix_guru at hotmail dot com/*** robot address ***/$robot_addr = '192.168.0.105';/*** robot socket port ***/$robot_sock = '5000';if (isset($argv)) { // If running from the command line$command = $argv[1];$parameter = $argv[2];}else { // Else if called from a Web Page$command = $_GET['command'];$parameter = $_GET['parameter'];}// Initialize a Command string from the values passed in 'Command' and 'Parameter'$sock_cmd = $command . ", " . $parameter . "\n\r";if (isset($command)) { // If a command is available// Create a TCP/IP socket to Robot// http://www.php.net/manual/en/function.socket-create.php$socket = socket_create(AF_INET, SOCK_STREAM, SOL_TCP);if ($socket === false) {return "Error: socket_create() failed: reason: " .socket_strerror(socket_last_error());}// Connect to the server running on the 'bot at $robot_addr:$robot_sock$result = socket_connect($socket, $robot_addr, $robot_sock);if ($result === false) {return "Error: socket_connect() failed.\nReason: ($result) " .socket_strerror(socket_last_error($socket));}// Write the command string to the Robotsocket_write($socket, $sock_cmd, strlen($sock_cmd));socket_close($socket);}?>
As I stated, this is an example... If you wish for me to go further into detailed explanation, please comment below.
In the next article (2 of 3), I will describe how to receive and parse the command in python on the Raspberry Pi and forward it to an attached Arduino via the I2C bus.
And finally in article 3 of 3, I will describe the Arduino code that receives the I2C command, and turn it into motor actions to steer and run the robot.
Edit (05/13/2014): here is the button_box image... it's missing from my github...

Resources:
https://code.google.com/p/phpwebsocket/
http://www.w3schools.com/tags/att_area_shape.asp
http://letsmakerobots.com/node/39791
http://www.php.net/manual/en/function.socket-create.php
http://www.php.net/manual/en/sockets.examples.php
No comments:
Post a Comment